How to Fix Your Diana Mini's Film Adance Problems on Your Own
100 119Diana Mini is a great camera, and with this quick modification, we will make it better. When I could not find the answers I was looking for, I took matters into my own hands. I have a knack for taking things apart and fixing them so I thought this would be easy, and I was right.

I brought my Diana Mini and four rolls of film to my best friends wedding. I was upset when every roll of film would stop at picture 15 and would not advance anymore. The advance knob would get stuck or it would not advance fully. I searched for answers but all I found were other people that were having the same problems. I love my Diana Mini and I wasn't gonna let this problem slow me down.
The Diana Mini, being a fully mechanically camera, means that there are not any electronics. Advancing the film and taking a picture is a very simple process within the camera. I figured out exactly what the problem was and I want to share it with all my Lomography Brothers and Sisters. The notes for each photo will be below the picture itself. Also, this repair can be done with film in the camera because you only need to remove the blue top. But if you do, the film counter will not be at the right number, until you reset it when you remove the exposed film like usual.
Let's get it on!
Be careful. There will be many small parts, sharp objects, and things that can go wrong. The Diana Mini is made of plastic all throughout the camera and plastic is fragile. This is an easy repair but if you don't feel like you can do this, don't do it. Find a friend that is handy with fixing things, buy them lunch, then ask for their help. :D Only you will be held responsible if you mess up your camera. Read through the entire procedure before you begin the repair.
Materials

First, you would need to prepare the tools you will need.
- A: Container lids or anything you can put small screws and springs into without losing them
- B: Tweezers for removing and installing springs
- C: Something that blows clean air. This will help keep everything clean.
- D: A very sharp (NEW) razor blade.
- E: A small Philips screwdriver, flat head screwdriver
- Optional: small washer-Keep reading
Fixing the Film Advance
Remove all three of these screws. 1 on the back, on the left, and on the right.
The top of the Diana Mini is latched just below the viewfinder in the front. Stick a flat head screwdriver between the top and bottom and pry up very carefully at this spot. Don't worry about the format switch on the back, it is not attached to the bottom, it just kinda hangs there with the top.
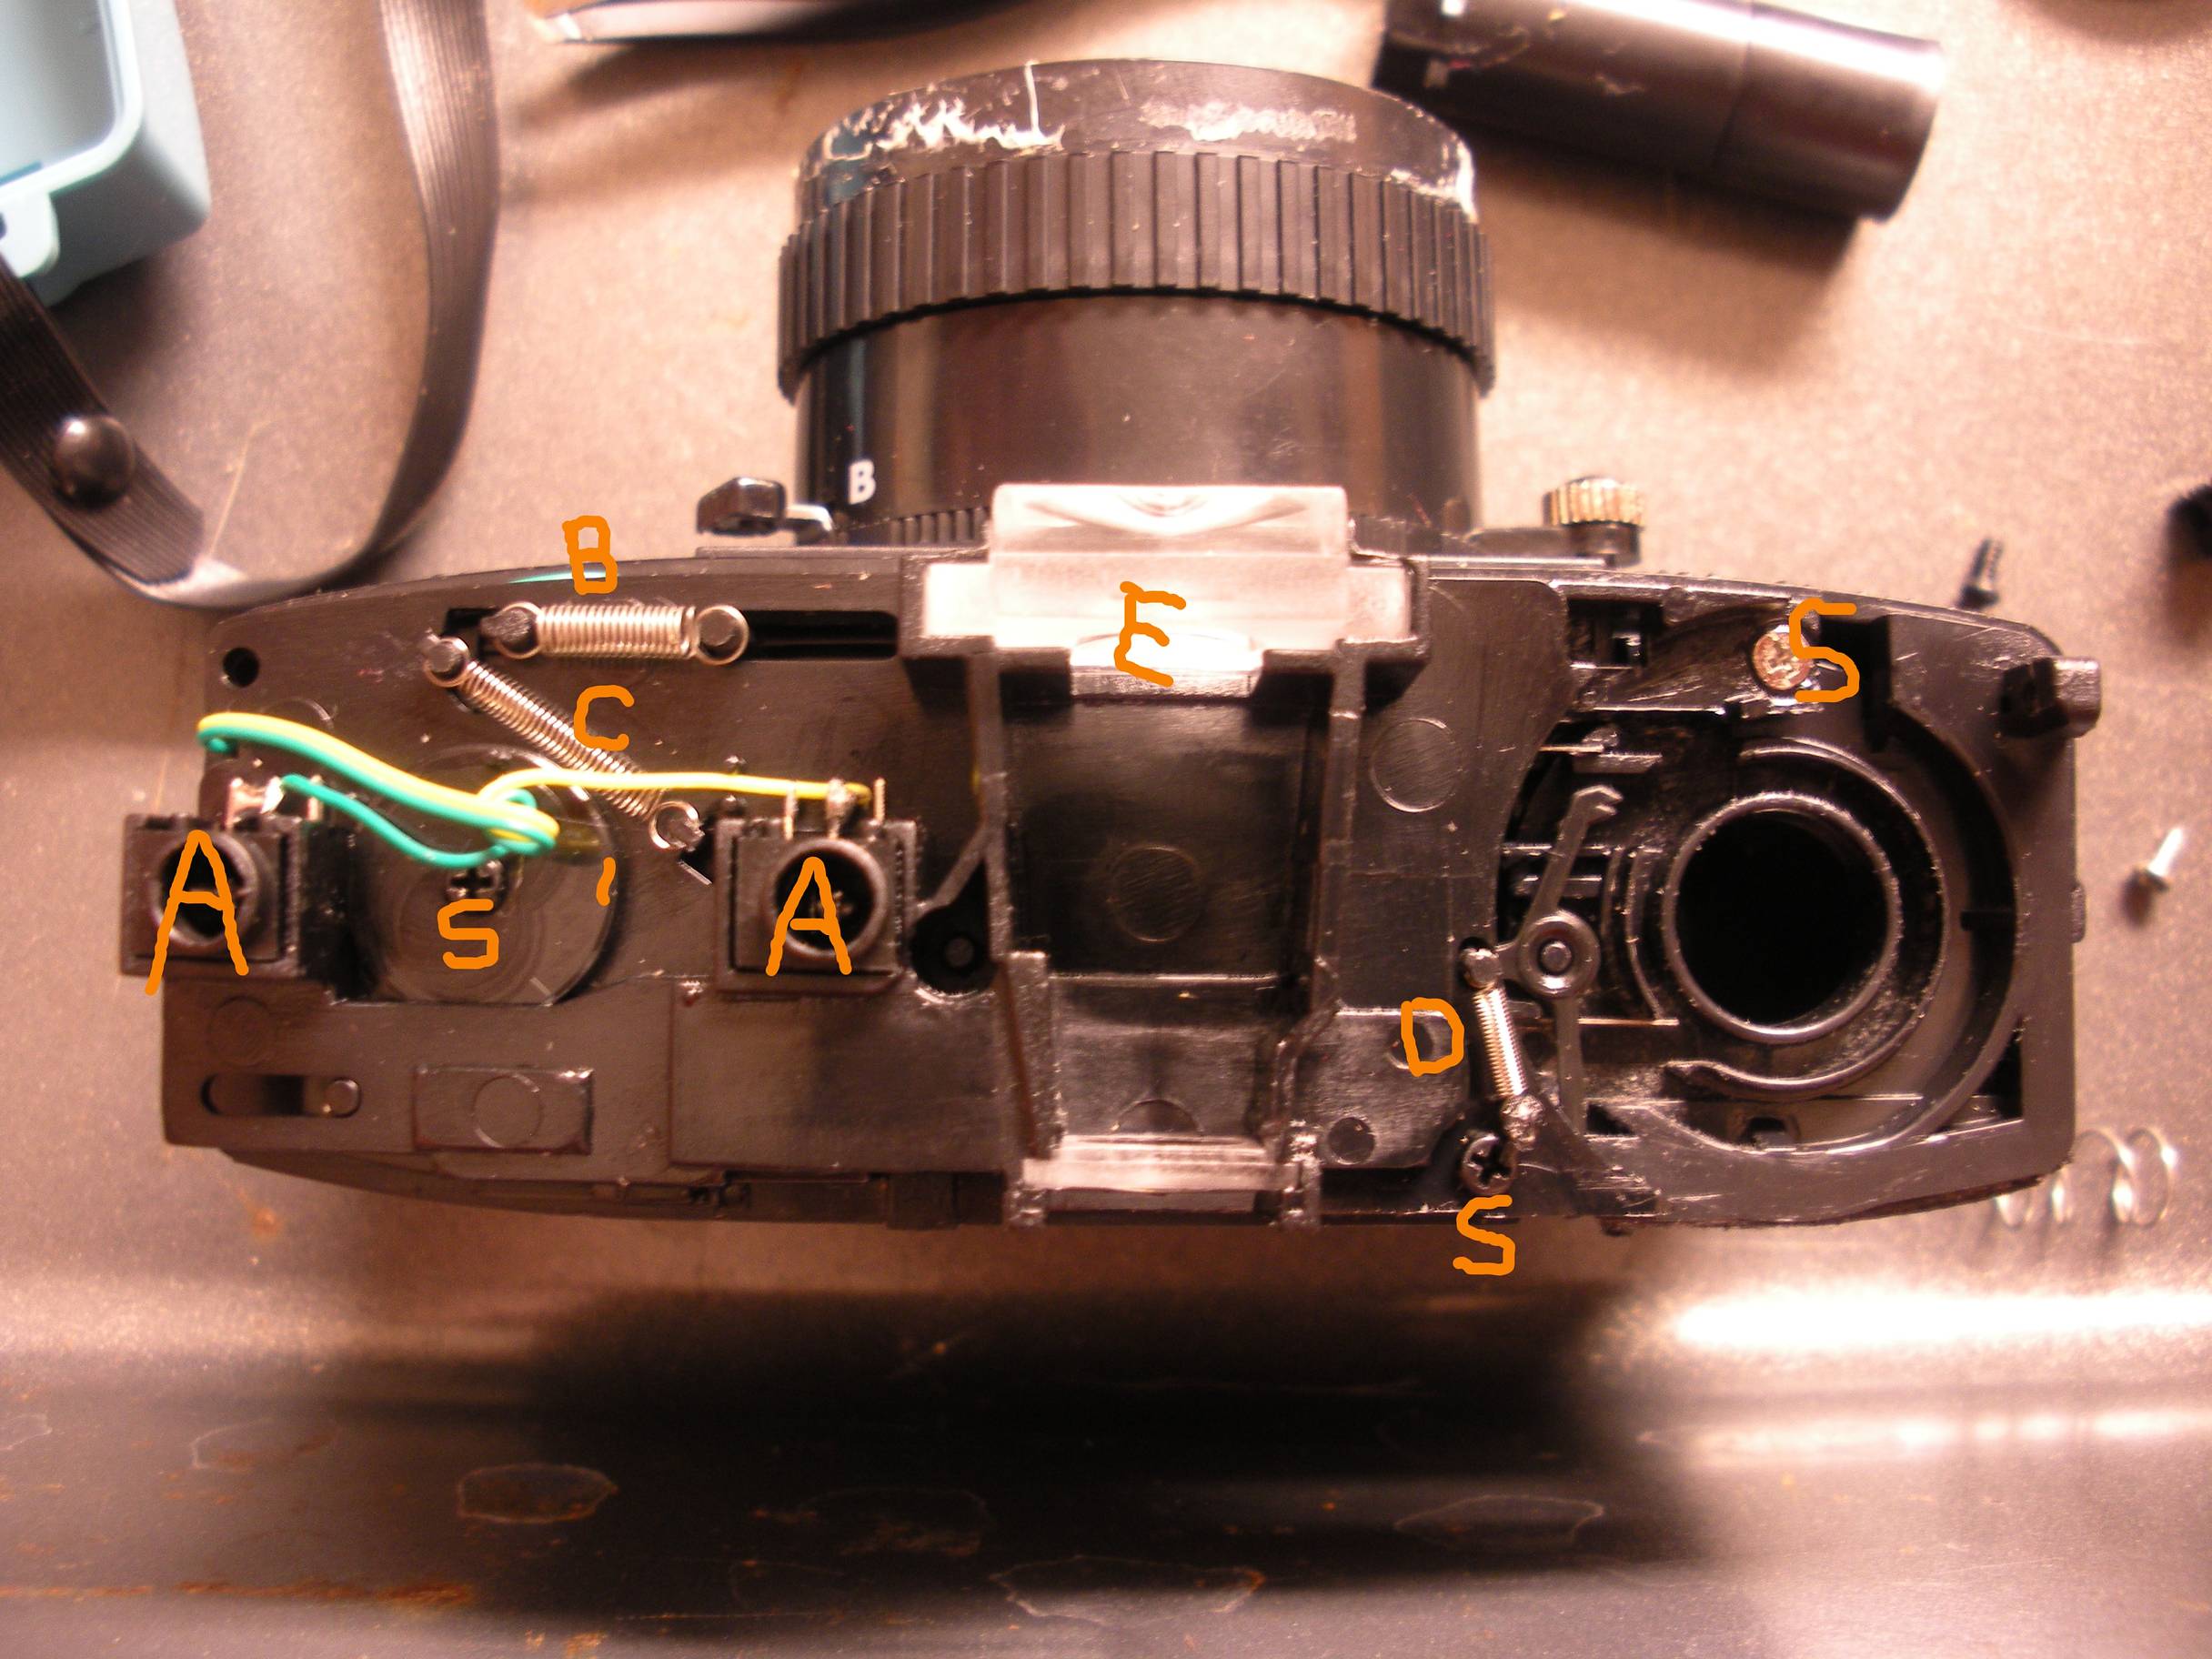
Now the top is removed and you are almost to the main part. The Film Advance counter has already been removed in this picture. Time to remove the gear cover.
- A: This is the contacts for the flash. When the gear cover is removed this will stay attached to the cover and the cover will hang to the side. Be careful because these are very small and delicate wires.
- B: Big fat spring.
- C: Long skinny spring
- D: Short skinny spring.
- E: Front viewfinder glass, there are 2 plates that sit in this slot that will fall out, so don't lose them
- S: 3 Screws you need to remove
Remove Springs B and C with tweezers. DO NOT remove spring D. It can stay in place during the repair. Remove the 3 screws, the gear cover should come off now. Just lay it to the side and be careful not to break the flash wires.

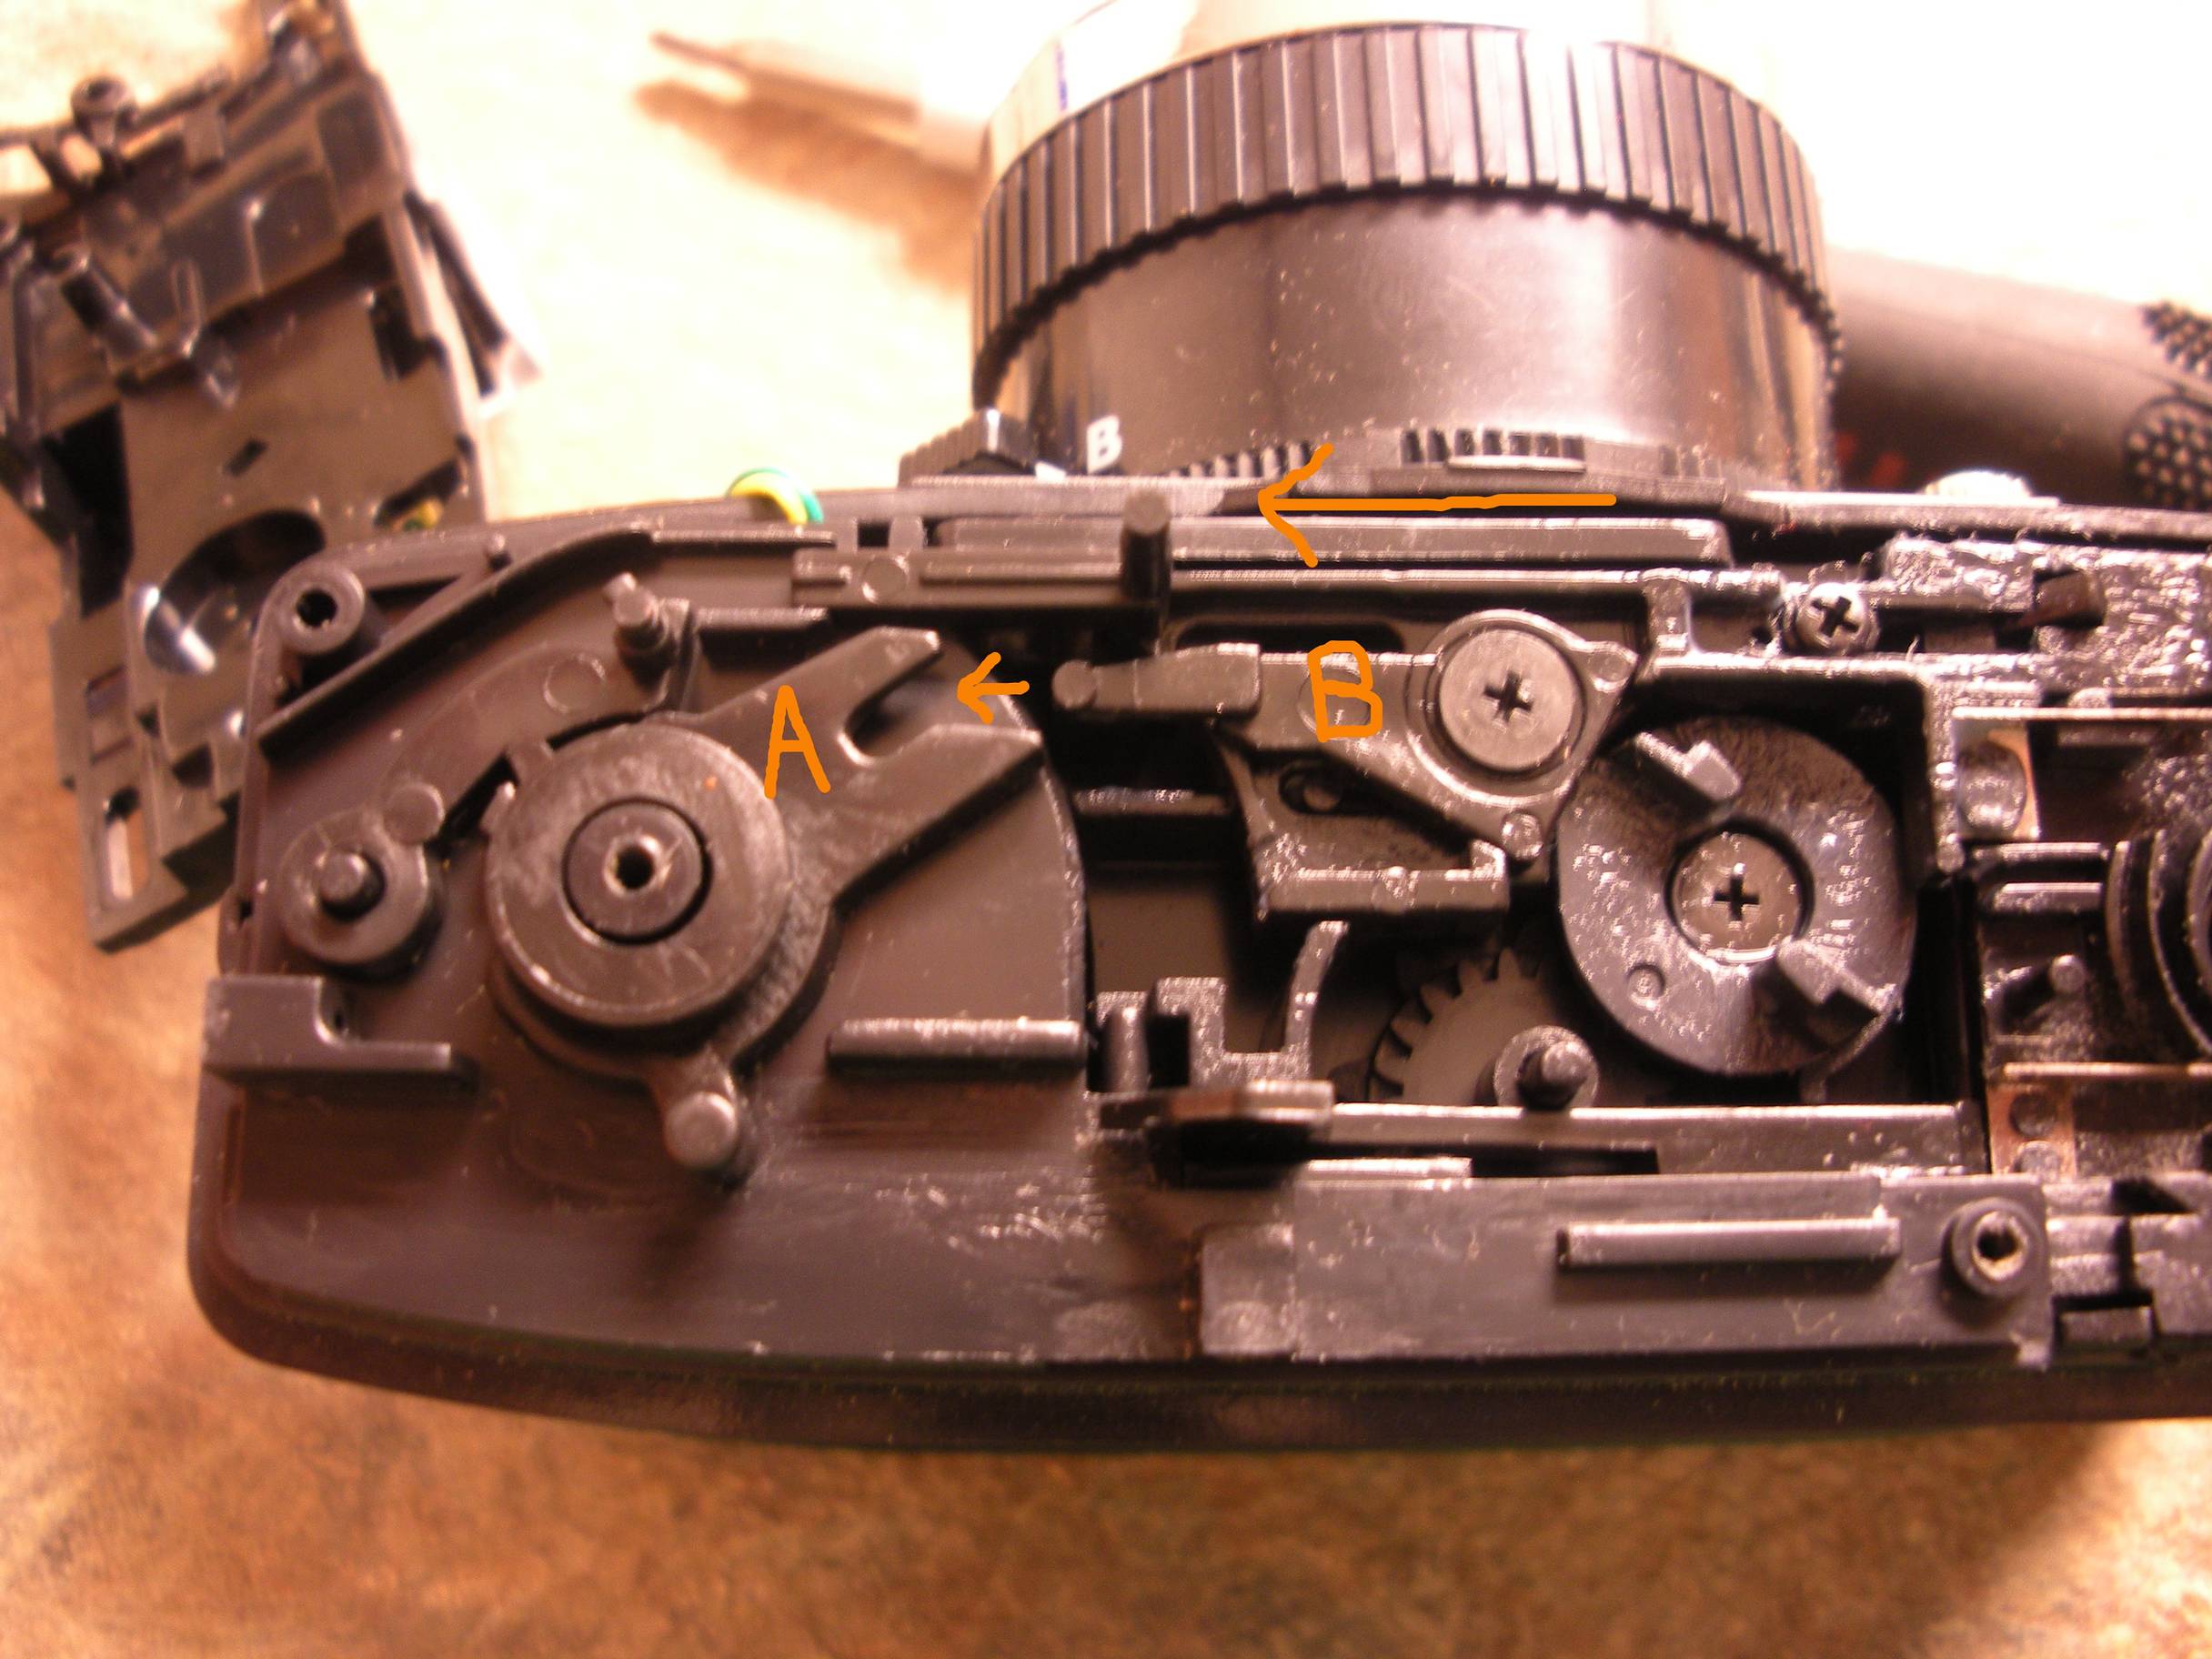
Here is what you will see. I will give a quick rundown on how this works. In this picture, the film is fully advanced. The shaft that the arrow is pointing to moves left when the shutter is fired, and right when the film is advanced. A is the cam that gets turned when you switch from square format to half frame format and vice versa. Right now A is in square frame mode. B is also in square frame mode. When the shutter is fired B will move to the left and should fit into the slot in B.

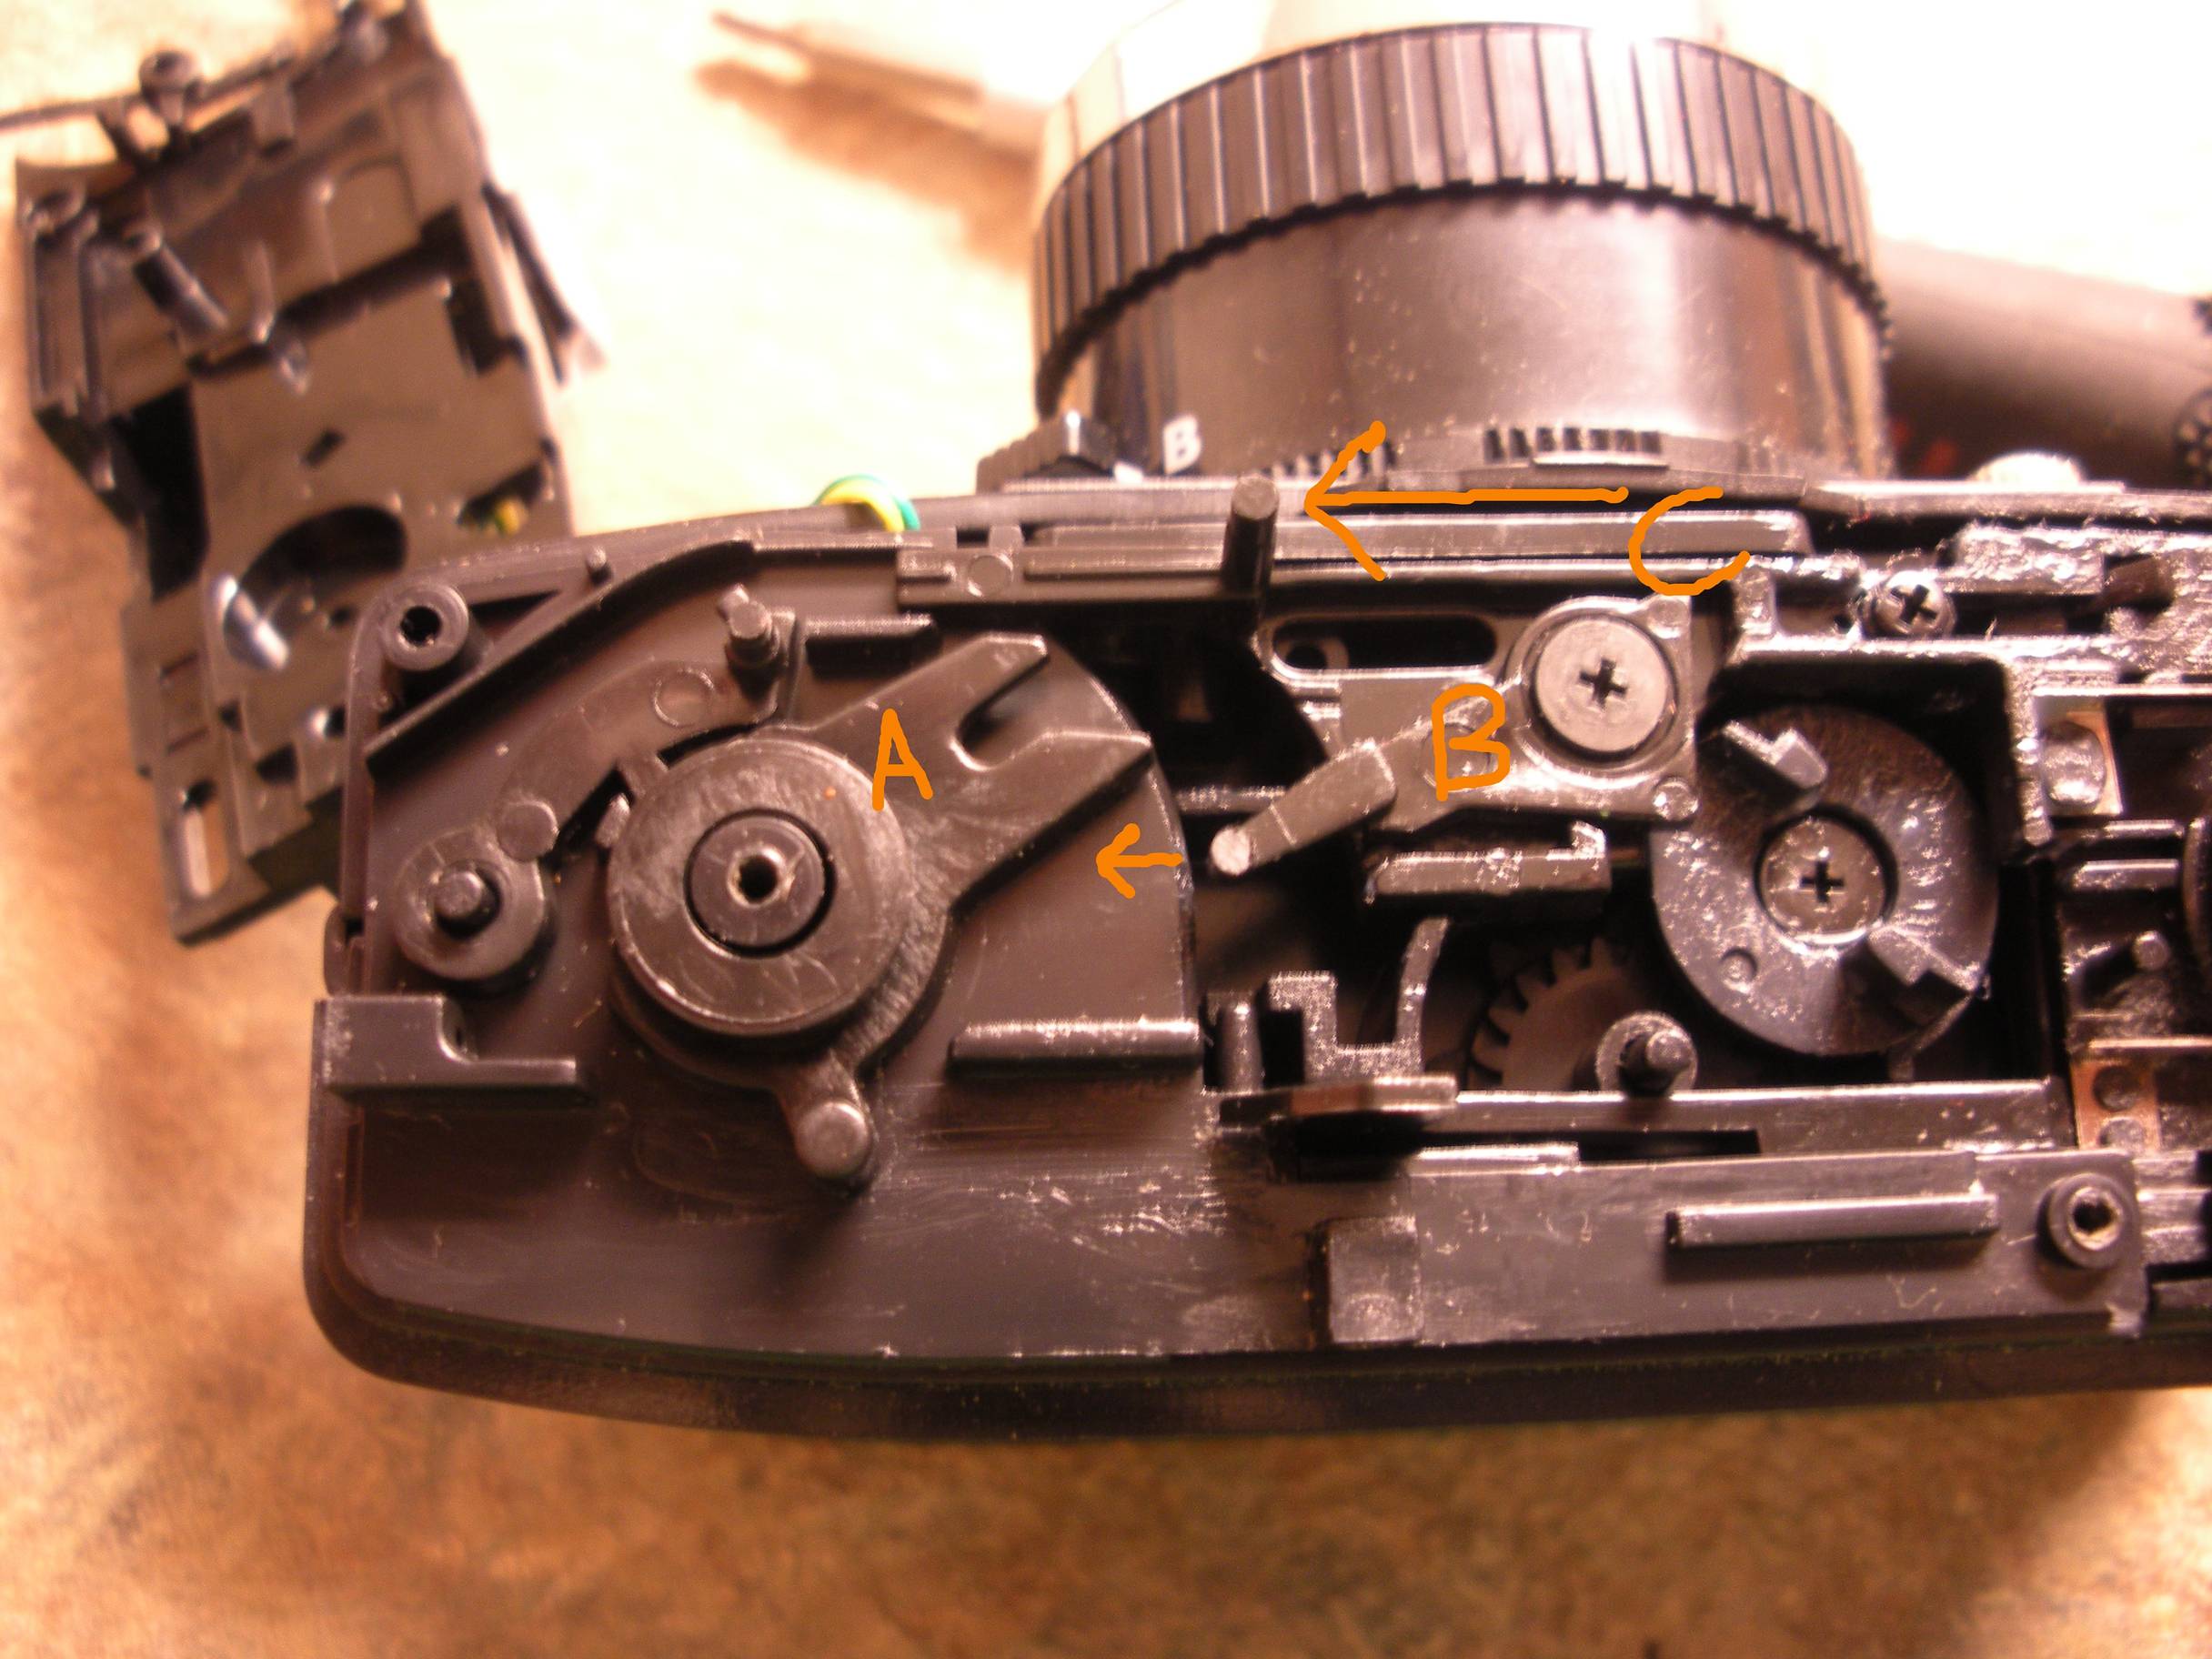
Here's another problematic scenario you might encounter with your Diana Mini's Film Advance: You just took a picture. You advance the film, then put the camera in your bag. Your bag will be carried around to many places, restaurant, vehicles, work, school, bathrooms, etc. OK, so here is what happens inside the Diana Mini that makes the film advance get stuck. B lever is held on by a screw, but, the screw does not hold tension on the lever. As you can tell by moving B lever, it can easily just flop around after the film is advanced. While it is in your bag, it got bumped and the B lever fell out of place.
Here is what is happening in the picture. A is in square frame mode, but B is in half-frame mode. when you fire the shutter, B will move to the left. Instead of lining up properly with the slot in A, B will get stuck under it. Now when you try to advance the film, it will get stuck, and possibly tearing the film if you try to force it.

Okay, let's fix this problem right now. We need to Stop the B lever from moving freely. Remove the screw the holds B in place. Remove the B lever. Now, you have 2 options here.
Option 1: Find a very small washer that will fit onto the screw. install the lever and put the washer between the lever and the screw. Screw in the screw until the B lever is tight enough, not to flop around. It will not take much.
Option 2: X marks the spot. This is where the screw goes. If you can take the razor blade and trim a very very very small amount of plastic off the top of this ridge where the screw goes. Go slow and remove a very little amount. Be careful not to apply too much pressure or you could break something. Now install the lever and tighten the screw until the lever no longer flops around. It should be tight enough so that is will take a little more pressure than before to move it. Don't tighten it so much that it won't move though. If it is not tight enough, shave some more off and try again.
Now clean all the shavings from the camera, blow everything will air to clean it out.

Line up the B lever so that it will be lined up with the slot at A.

Put the gear cover back on. Install the screws and springs in the correct locations. Blow everything off again to keep everything clean. Remember:
- B: big fat spring
- C: long skinny spring

This is where the film counter in installed. It can be kind of tricky. It may take 3 or 4 times but you will get it. X is where the tab on the spring at the bottom of the counter wheel will be inserted. you will see a slot at X. Insert the tab on the spring at X, and carefully wind the counter 1/2 a turn clockwise. Z is where the film counter window is at. If you have the back of the Diana Mini removed the counter will stay in place, sort of. Hold your finger on the counter to keep it from spinning out of place. Install the film format button into the blue top of the Diana Mini. There is a slot in the button and the slot should face down toward the bottom part of the camera. Keep holding the film counter in place and try to install the top without letting it spin out of place. It may take a few tries. Install the 3 screws that hold the top on. Now you are done, maybe.
Install a roll of film into the camera. Look at the film counter, it should be on E. If not, fire the shutter with the back removed. Keep the Cap on the lens and fire a shot. Advance the film. Fire a shot, Advance the film. Keep doing this until you reach the end of the roll. The film should advance fully every time and the film counter should move forward after each film advance. If the film advance still gets stuck, you probably did something wrong. Take it apart again and make sure everything is lined up right. If your film counter does not advance with the film, the spring popped out during the blue top installation. Remove the top and do it again.
That is it. Now you are done. You now need to show your Diana Mini some much-needed love. Go enjoy your Diana Mini because you have earned it. I hope I was able to help you. If you have any questions or suggestions feel free to drop me a line.
If you love your Diana Mini as much as I do, Let me know about it. Post your comments here. :D
This article was written by Community Member gnarlyleech.
written by gnarlyleech on 2010-08-05 #gear #tutorials #tutorial #repair #tipster #fix #help #how-to #diana-mini #advance #camera-modification #sticking-film #not-broke #diana-mini-top-tipster


100 Comments